This article will tell you some examples of how to split one cell text data into multiple columns after the cell data column in Excel.
1. Excel Split Data Into Columns Example Overview.
- There are 3 examples in this post.
- In the first example, it will split email addresses in column A into columns B and C. Column B saves the email name part, and column C saves the email domain part.
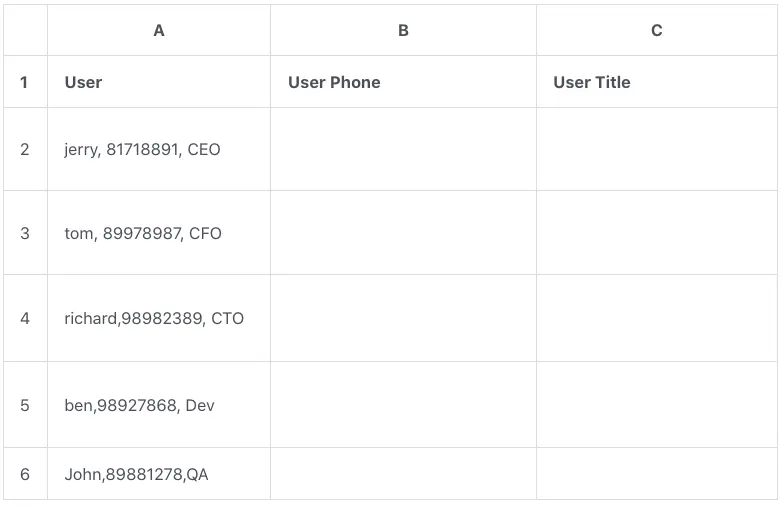
- In the second example, column A contains a long text, the text contains the user name, title, and mobile phone separated by a comma(,).
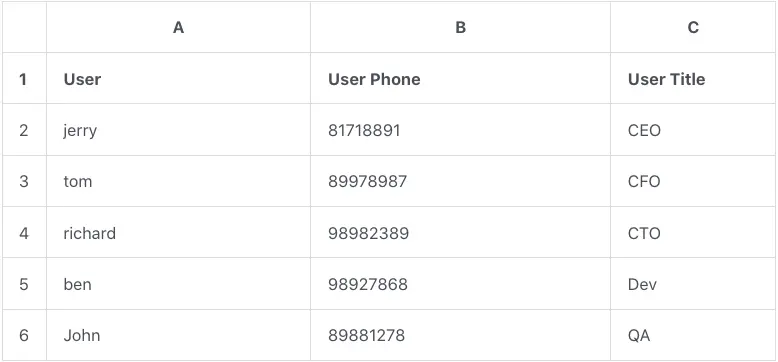
- What we want to do is split the long text into columns A, B, and C. Column A saves the user name, column B saves the user title, and column C saves the user’s phone.
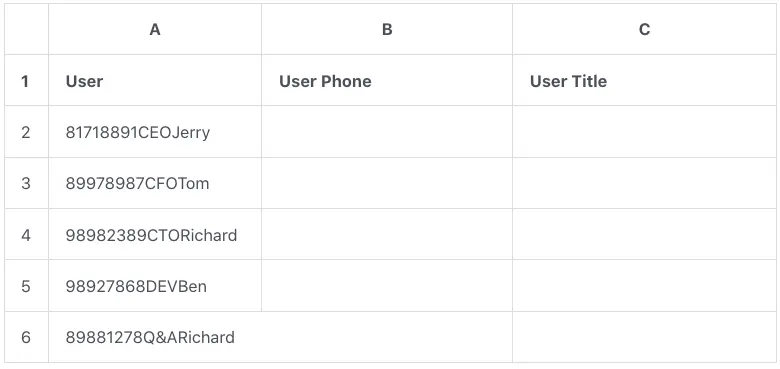
- In the third example, column A still contains long text, but there are no separators in the long text, so we have to set the split width manually to split the text in column A.
2. Split Email Address Into Multiple Columns In Excel Example.
- Below is the example data table.
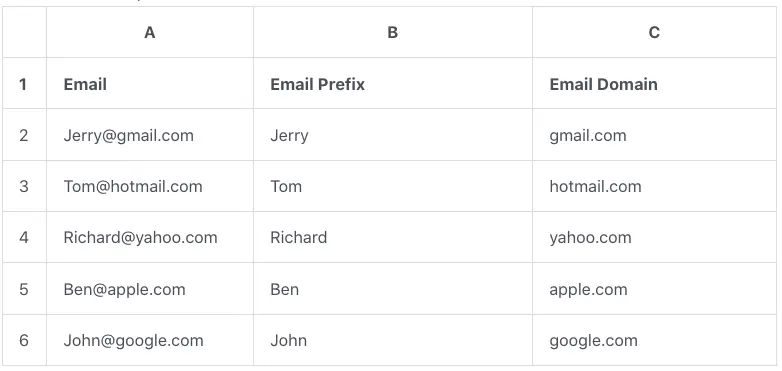
- Input the first email user name text ( such as Jerry ) in cell B2.
- Then click cell B2, press the Shift key, and click cell B6 to select the cell range B2:B6.
- Press the key combination Ctrl + E.
- Then you can find that Excel will fill all the selected cells in column B with the email user name part text.
- Input the first user email address’s domain (gmail.com) in cell C2.
- Select the cell in range C2:C6 like above.
- Press the key combination Ctrl +E again.
- Then it will fill the user email address’s domain part in the selected cells accordingly in column C.
3. Split Text That Contains Delimiter Into Multiple Columns In Excel Example.
- Below is the example data table before the text split operation.
- Below is the data table after the text split operation.
- To implement the above effect, you should first click cell A2 to select it.
- Then press the Shift key and hold, and click cell A6 at the same time to select the cell range A2:A6.
- On the Excel top ribbon area, click the Data tab —> Text to Columns icon button in the Data Tools group.
- It will open the Convert Text to Columns Wizard dialog window.
- Check the radio button Delimited in the Original data type section and click the Next button.
- In the Delimiters group, check the checkbox Tab, Comma, and Space.
- You can see the split result in the Data preview area.
- Click the Next button.
- In the next wizard window, the original text has been split into 3 columns in the Data preview area.
- Click each column in the Data preview area, then select the Text radio button in the Column data format group and click the Finish button.
4. Split Text That Does Not Contain Delimiter Into Multiple Columns In Excel Example.
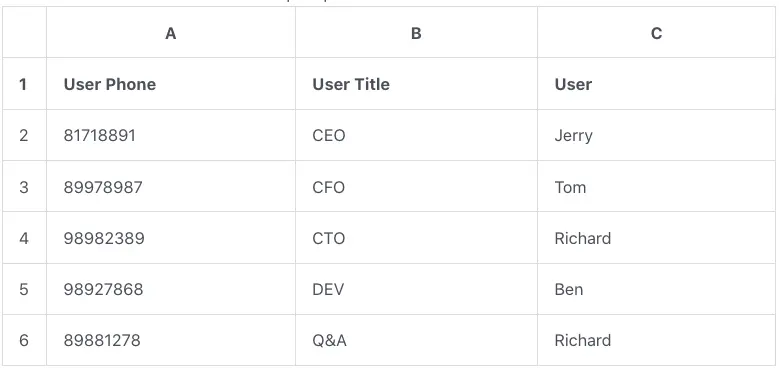
- Below is the example data table before the text split operation, we can see the text in column A does not contain any delimiter.
- Below is the data table after the text split operation.
- Click cell A2 to select it, press the Shift key, and click cell A6 at the same time, then select the cell range A2:A6.
- On the Excel ribbon area ( located at the Excel top menu bar ), click the Data tab.
- In the Data Tools group, click the Text to Columns icon button to open the Convert Text to Columns Wizard.
- Select the Fixed width radio button in the Original data type group area and click the Next button.
- It will open the column break lines wizard dialog window, you can create, delete, and move break lines on your original cell text in this dialog.
- You can see there is an x-axis line in the Data preview area, click the number 10 on the x-axis, then it will create a break-line in your original cell text.
- You can move the break-line position on the x-axis and split the cell data manually to set the user phone, user title, and user name column width.
- You can create multiple break lines to separate the cell text into multiple columns.
- Click the Next button to go to the next wizard.
- Now, the original cell text has been split into multiple columns in the Data preview area.
- Select each column in the Data preview area, and select the Text radio button in the Column data format group section.
- Click the Finish button to complete the split process.
- Now you can see the data table with the split text in each column.
- This kind of text split requires each column of the data in the original cell to have the same and fixed width, otherwise, it will not split out each column’s text accurately.