In this article, I will tell you 2 methods to convert an Excel table or cells region to an HTML source code.
1. How To Use Formula To Convert Excel Cells Region To HTML Code.
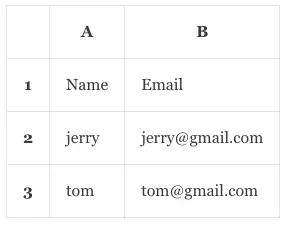
- In this example, there are 2 columns.
- The first column saves the user name and the second column saves the user’s email address.
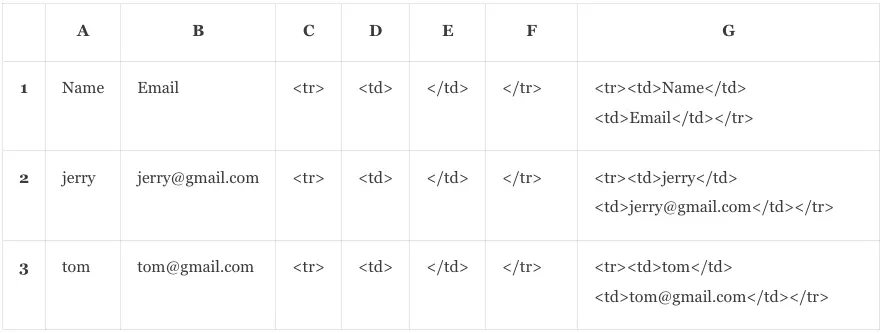
- Input the Html table elements in cells C1, D1, E1, and F1.
- Select cell range C1:F1, and then drag down the small square on the bottom right corner of the region to the last row to auto-fill the row data.
- Input the formula =C1&D1&A1&E1&D1&B1&E1&F1 in cell G1 and press Enter key, then you can find the Html table source code in cell G1.
- Autofill the other cells’ data in column G by dragging the small green square on the bottom right corner of cell G1.
- Select cell G1, press the Shift key, and click cell G3 to select cells G1:G3.
- Press Ctrl + C to copy the HTML source code in cells G1:G3.
- Then you can press Ctrl + V to paste the above HTML source code to the HTML editor.
- Below is the example Excel cell data.
2. How To Convert Excel Table To HTML code Manually.
- Select the cells that you want to convert to an HTML table.
- Click the File tab, then click the Save As menu item.
2.1 Convert To Html File On macOS.
- If you use Excel on macOS, then you can select the item Web Page (.htm) from the File Format drop-down list.
- Then it will display 3 radio buttons below the above list, they are Workbook, Sheet, and Selection:$A$2:$B$3.
- Click the Web Options… button to open the web options dialog window.
- You can input the web page title and keywords in the web options window.
- Click the Save button to convert the selected cells into an HTML file.
2.2 Convert To Html File On Windows.
- If you use Excel on Windows, you can click the Browse item to browse a folder where you want to save the HTML file.
- Select Web Page from the Save as type drop-down list.
- Input the HTML file name in the File name input text box.
- If you just want to convert the selected cells, then check the radio button Selection:$A$2:$B$3.
- If you want to convert the entire workbook, you can check the radio button Entire Workbook.
- Click the Save button will open the Publish as Web Page dialog window.
- You can change the title in this window by clicking the Change… button.
- You can check the checkbox AutoRepublish every time this workbook is saved to auto-regenerate the HTML file.
- You can also check the checkbox Open published web page in browser to open the HTML file in a web browser after publishing it.
- Click the Publish button to generate the HTML file.
- Then you can open the generated HTML file to get the converted HTML source code.