Suppose you have an Excel workbook that contains multiple sheets with sensitive information, such as financial data, HR records, and customer lists. You want to share the workbook with a team of colleagues, but you only want them to be able to access certain ranges of cells within each sheet based on their roles and responsibilities. To do this, you can apply different passwords or permissions to different cell ranges. So that when user access this worksheet, it will ask password to them to check their permission. This article will tell you how to do it.
1. How To Apply Different Passwords To Separate Ranges In Workbooks In Excel.
- To apply different passwords or permissions to separate ranges in workbooks in Excel, follow these steps.
- Open the workbook that you want to apply password or permission to separate ranges.
- Select the range that you want to apply password or permission to.
- On the “Review” tab, click “Allow Edit Ranges” icon in the Protect group.
- Then it will open the Allow Users to Edit Ranges dialog window.
- In the “Allow Users to Edit Ranges” dialog box, click “New” to create a new range.
- In the “New Range” dialog box, specify the range that you want to apply password or permission to.
- Input the Range password in the related input text box and give the range a title.
- Then click the “OK” button to save the new range.
- In the “Allow Users to Edit Ranges” dialog box, select the range that you just created and click “Modify“.
- It will open the Modify Range dialog box.
- In the “Modify Range” dialog box, specify the password or permission that you want to apply to the range and click “OK“.
- Click “OK” to close the “Allow Users to Edit Ranges” dialog box.
- Save the workbook.
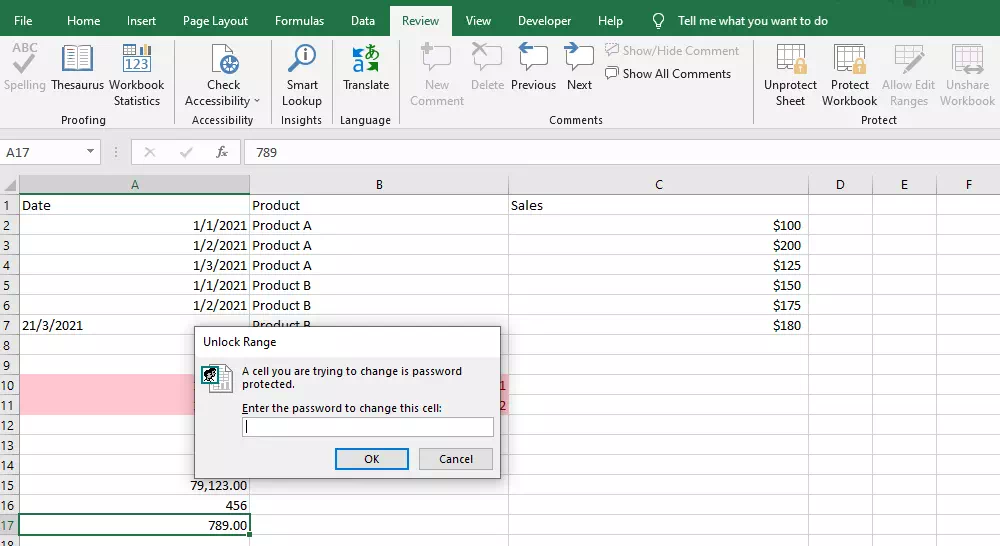
- Now, when someone tries to edit the ranges that have passwords or permissions, they will be prompted to enter the password or get permission from the owner of the file.
2. How To Set The Permission To Different Users And Use It To Protect Cell Range Access.
- To set permission to different users and use it to protect cell range access in Excel, follow these steps.
- Open the workbook that you want to set permission for.
- Select the range of cells that you want to protect.
- On the “Review” tab, click “Allow Edit Ranges” icon in the Protect group..
- In the “Allow Users to Edit Ranges” dialog box, click “New” to create a new range.
- In the “New Range” dialog box, specify the range that you want to apply permission to, and click “OK“.
- In the “Allow Users to Edit Ranges” dialog box, select the range that you just created and click “Permissions” button.
- In the “Permissions” dialog box, click “Add” to add a new user or group.
- In the “Add Users” dialog box, type the name of the user or group that you want to add, and click “OK“.
- In the “Permissions” dialog box, select the user or group that you just added and set the permission level that you want to Allow or Deny.
- The permission is Edit range without a password, when you select Allow, it means the user or group of users can edit the range without password.
- Click “OK” to close the “Permissions” dialog box.
- Click “OK” to close the “Allow Users to Edit Ranges” dialog box.
- Save the workbook.
- Now, when someone tries to access the protected cell range, they will be prompted to enter their username and password.
- If they have the required permission level, they will be able to edit the cells; otherwise, they will only be able to view the cells or receive an error message.
- By setting permission to different users or groups, you can control who has access to the sensitive data in the workbook and ensure that it is only accessible to authorized personnel.
3. How To Make The Above Password Working.
- There are one more step to make the above password working.
- Select the above worksheet, then click the Review tab —> Protect Sheet icon in the Protect group.
- It will let you to input the password to protect the worksheet.
- Now when a user click the cell range that are protected by the password you just configure above.
- It will prompt a password dialog to let the user input the password to unlock the cell range before he can edit it.
- If you do not protect the worksheet, the password protected cell range will not take effect.
- If you click the cells out of the protected cell ranges, it will let you to unprotect the worksheet first.
- If you unprotect the excel worksheet, you can edit all the cells in the worksheet includes the password protected cell ranges.
References